Theatre
Lighting for theatrical productions or musicals tends to be in the form of cues – these are individual lighting states that are worked through in order from the start of the show to the end. There’s rarely any improvisation or modification of cues once the show is up and running.
When you need to explain your show to a new technical team who are helping you set it up in a new space, it’s helpful for you to have prepared the following:
1) List of the lighting states you need, with a brief description
This is far more useful than a fully marked-up script.
Example:
– Blue backlight (to cover whole stage, used for scene changes)
– Warm general wash (front light), splitting the stage into three areas across. No need for separation between upstage / downstage.
– Cold wash on the downstage right corner (around 2 metres wide & 1.5 metres deep)
– Red spotlight downstage centre (big enough for two people, head to foot)
– Tight spotlight on actor’s face – he stands upstage right, just on stage of the door.
Using this information, the tech team can work out the lanterns / equipment that you need.
AVOID being ultra-specific about particular pieces of equipment, without describing what it’s for in detail.
For example, don’t say:
– I need 12 Source 4 profiles spread around the rig
– 14 fresnels – red
The reason to avoid this kind of thing is that very often the tech team in a venue will know the best way to achieve the various effects you need for your show, and will be able to advise you, IF you give them the right information about what you actually NEED, not what you had last time you did the show in a completely different venue.
2) Tech Script
- Number the lighting cues sequentially, starting from 1.
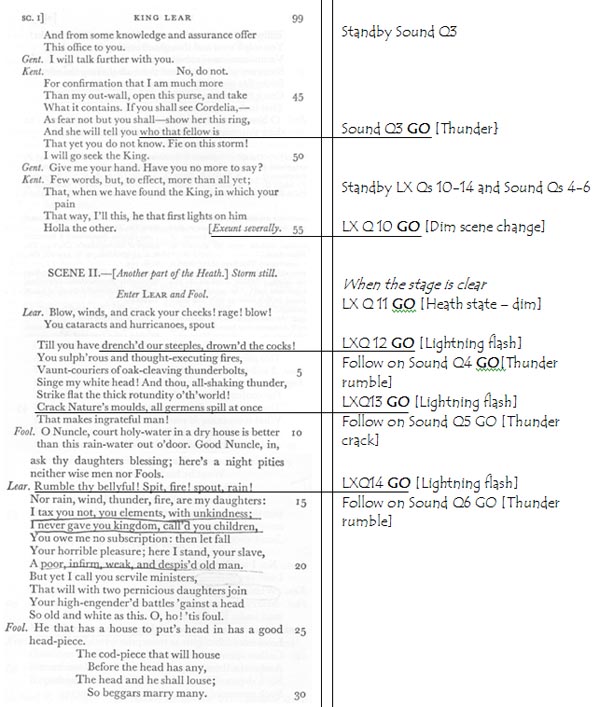
- Write the cues in the following way: LX Q 1 GO (LX stands for Electrics, and nowadays means lighting; Q is the cue number. GO is the action word that means this is the exact point when the lighting change should happen).
- Don’t forget the house lights / preset. Very often the first state of the show (house lights, preset on stage) is numbered LX Cue 0.5 – this means the first actual CUE of the show is numbered ‘1’.
- This is an example of how a script COULD be marked out – try to print it so that there is either a blank page on the right of the folder (assuming you / your stage manager is right-handed) OR allow a large right-hand margin. The Standby cues are usually marked in if you have a Deputy Stage Manager (DSM) cueing the show.

See also Stage Management – Prompt Book for more on writing cues into a script.
Numbering
For complex shows, some designers use a new sequence of numbers for each scene, with more of a gap between each cue, to allow for additional cues to be inserted during the technical rehearsal process. For example, scenes might start at cue 100, then cue 200, then cue 300 and so on, with cues numbered 10, 20, 30 etc., then additional cues 11, 12 etc.
However, this can lead to confusion between the DSM and lighting operator, where it’s harder to see whether a cue has been missed, and jumping from cue 44 to cue 100 could look like an error.
Modern lighting systems can add ‘point’ cues between consecutive numbers (e.g. Cue 10.1, 10,2 ) for additional cues, but this can cause complications for the DSM to call cues – sometimes the additional cues are named 10A, 10B etc. and sometimes the DSM calls the actual point cue number.
The ETC EOS system allows up to 999 point cues between existing numbers (e.g. 1.001, 1.002 are permitted, but not necessarily advised for cues called by the DSM, to avoid confusion!).
Plotting Lighting Cues
After rigging the lighting equipment, and focussing each instrument, the lighting plotting session is when the cues are set up so that, for the first time, the team can see each lighting moment and tweak it until it’s right for the show.
Manual Control Board
Until the late 1980s, most theatre productions used a manual (non-computerised) lighting control. Although memory controls were available since the 1960s, they weren’t affordable until the advent of microprocessors in the 1980s, and were not widely adopted until the 1990s.
Plotting lighting cues on a manual board was simply a matter of writing down the changes required to the lighting desk to achieve the necessary looks.
Manual desks had a number of presets (multiple versions of channel control faders, which can be set up differently for different moments).
COMING SOON – VIDEO DEMONSTRATION
Memory Control Desk
Overview: The process is the same as for a manual desk, except that nothing needs to be written down. Broadly, the lighting states are set up by bringing up lanterns one by one, or in groups, to achieve the look that’s required for that moment on stage. Once the designer is happy, the state is recorded into the computer desk, and given a Cue number. That cue number can be recalled using the control desks’ playback functionality.
MORE COMING SOON
COMING SOON – VIDEO DEMONSTRATION
Music / Events
Lighting for bands or events requires you to create a number of ‘looks’ or palettes, which can be used as appropriate through the show.
Lighting in this way is known as ‘busking’ – you’re effectively deciding on the lighting that is needed for each moment of the show as it happens.
Obviously it’s rarely completely random – you talk through the looks you need with the band or organisers of the event, and your aim as lighting designer is to deliver these as accurately and sensitively as possible.
Keywords: Plotting Lighting on a Memory Board, plot memory, memory lighting desk, plotting memory on board information
