
Although a typical sound mixing desk can vary from a device under £100 to a state-of-the-art £30,000 monster, and although this is a very simplified view, all mixing desks can be broken down into basic components.
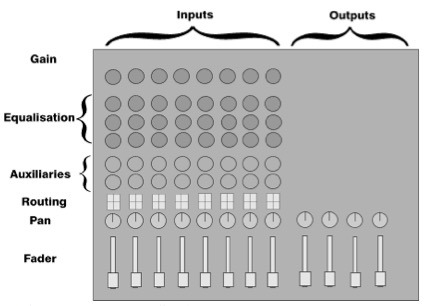
The most basic division is between INPUTS and OUTPUTS.
An INPUT is where a sound source is connected to the equipment (e.g. a microphone, a PC for sound effects playback, a music keyboard etc.).
An OUTPUT is where the mixed audio can be connected to amplifiers and loudspeakers.
Each mixing desk is divided into INPUT CHANNELS. Each channel can be thought of as a separate sound input.
INPUT CHANNELS
Gain controls the sensitivity of the channel to the incoming sound. A low level microphone signal will require a high gain level. A higher input (from a PC or a CD player, for example) will need little or no gain.
Equalisation (EQ) controls are used to adjust the tonal quality of the sound. Most mixing desks have at least two or three EQ controls for high, middle and low frequency sounds.
Auxiliaries can be used for additional routing of sound to external devices. (see Buses below)
Routing switches control which of the outputs the sound is sent to.
A basic system might have two speakers downstage facing the audience, and another pair of speakers upstage as ‘effects’ speakers to help place the sounds in the correct place for the audience.
Pan control positions the sound in the stereo “image” of the output.
Fader is used to control the volume of sound sent to the output. Most faders are calibrated in decibels, so that with the fader at the bottom, it’s at infinity (ie no sound gets through). The optimum position for the fader is around 70% of the way up. This is normally marked 0db, and means the desk electronics are neither amplifying or attenuating (reducing) the signal – it’s at its optimum.


Buses
Each of the outputs within the mixing desk is known as a bus. The main output bus is most commonly used, but the auxiliaries can prove invaluable.
Using, for example, the Aux 1 bus, a microphone signal can be routed to an external (“outboard”) reverb unit, or to a recorder. Using the Auxiliary controls on the desk, a separate ‘mix’ can be produced without affecting the main output of the desk (ie what the audience hears).
Preset Sheet
A blank sheet showing the settings / connections on an analogue sound desk, enabling the operator to note the ‘state’ of the desk.
Setting Up A Mixing Desk
To get the best quality from the sound system, it should be optimised. This process involves setting the gain structure correctly for the inputs you are using.
Setting the gain on the input channel
If the input gain is too low, your faders have to be too high, resulting in unwanted noise (hiss). If the gain is too high, the faders are low, and you don’t have as much control as you want (for example, to do a nice smooth fade out). High gain also runs the risk of peaking – this is when the input signal (from a microphone, for example) drives the electronics too hard, and results in distortion. Many desks have a ‘peak’ light, or a meter, which will indicate that this overload / distortion has occurred.
The best way forward is to set the input gain as high as possible WITHOUT peaking. To do this, you need to have the performers / singers / musicians in front of the mic, so you can set the gain with them present.
The mixer may have a calibrated meter. The bottom two-thirds may be green, followed by a yellow section, and then a red section at the very top. The aim is to be hovering at the top of the green, and sneaking into the yellow section during the loudest parts of the performance. The red section must not be entered. You don’t need to worry about hearing the results of your work yet – keep the faders down and just concentrate on setting the input gain.
Once you’ve set the input gain, set the levels of the amplifier that’s feeding the speakers to around two-thirds of maximum (around 70%). Then set the input channel fader to the same sort of position. One some mixers, this 70% level MAY be calibrated as 0db (and is known as ‘unity’). Try setting the output faders (e.g. the Main L-R / Main Mix outputs) to around 40% of their maximum level. How does that sound? If you’re getting the level that you want, that’s perfect. If not, try adjusting the amplifier output volumes up or down a bit.
The video below provides a great practical demonstration of how to set the gain structure.
How to Reduce Feedback.
Feedback (also known as Howlround) occurs when the sound from a speaker goes back into the microphone (which is then amplified through the speaker, and so on, in a loop). Whether you get feedback in a particular situation depends on a number of interacting factors, including the relative position of the speakers & microphones, the shape and size of the room, whether the walls have curtains / drapes on them or whether they’re plastered, presence / absence and size of audience etc. It can be reduced in a few ways:
- Move the speakers forward (or adjust their focus) so that they’re directed away from the microphone.
- Reduce the volume of the microphone
- Adjust the EQ of the microphone channel to try to ‘tune out’ the frequencies that are causing the feedback.
- If you have a number of microphones ‘live’ across the stage, try reversing the phase of a few of them. Or turn off any that are not required at that moment.
COMING SOON
Information about digital mixing desks
Mixing Monitors from Front of House
See also Mixing Desk Archive