
Lighting - Designing and Focussing a General Cover
NEW PAGE - Under Construction
What is a General Cover?
A general wash of light, appropriate for the event, which provides basic illumination of the stage, evenly.
The main job of the lighting designer, for any kind of event, is to enable what's happening on stage to be visible to the audience. Of course, different degrees and styles of visibility are appropriate for different kinds of work. A general cover for a piece of drama will be different from one for comedy, or for dance.
The following assumes you're lighting for a live audience. An event that's going to be televised (or which will be recorded for broadcast / live stream) will need a more consistent lighting approach than it's possible to use for a live show, as video cameras are much less forgiving when there are irregularities in the wash.
This page assumes that automated lighting / moving lights are not in use.
Decision One - How should the stage be divided up?
If you have an end-on open stage with no set, the stage should be divided into equal bays or zones across the stage, and also up/down stage. Always use an odd number of bays across, so that you always have centre stage well-lit, as this is where actors will tend to gather.
However, where you have an uneven set, or particular 'rooms' or areas that the stage is divided into, these will dictate the position and size of the zones you should divide the stage into.
Why divide it at all? If you have a very small space, it may be possible to use a pair of wide-angled wash lights to illuminate the whole stage. However, once the stage gets more then around 5m wide, you'll need multiple zones to ensure effective use of the lanterns you have.
Dividing the stage up will also give you plenty of flexibility if you need to emphasise a particular area at a particular moment.
Decision Two - Which lanterns should I use?
For a traditional proscenium arch venue and an end-on audience, profile spots (aka ellipsoidals) are the best way of getting light onto the stage from above the audience.
However, in a smaller venue or in a studio theatre, fresnels (soft-edged wash lights) may be a better solution. Wash lights will also be more effective in non-standard seating layouts.
Ensure that all of the lanterns doing the same job are of the same type - don't mix and match different types or brightnesses.
Decision Three - Which positions work best?
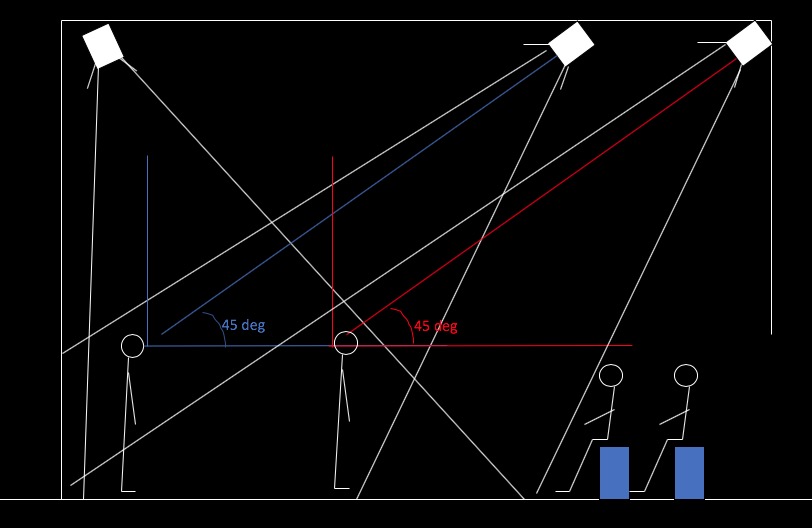
For traditional end-on lighting, as a general rule, each zone of the general cover should have two front lights and one backlight. The front lights should be at a vertical elevation of 45 degrees from horizontal - this ensures the actors' faces are well-lit, including the eyes, and reduces unsightly shadows under the chin (see diagram below).
Section view of a small stage, using fresnels to light the stage with an upstage and a downstage zone.
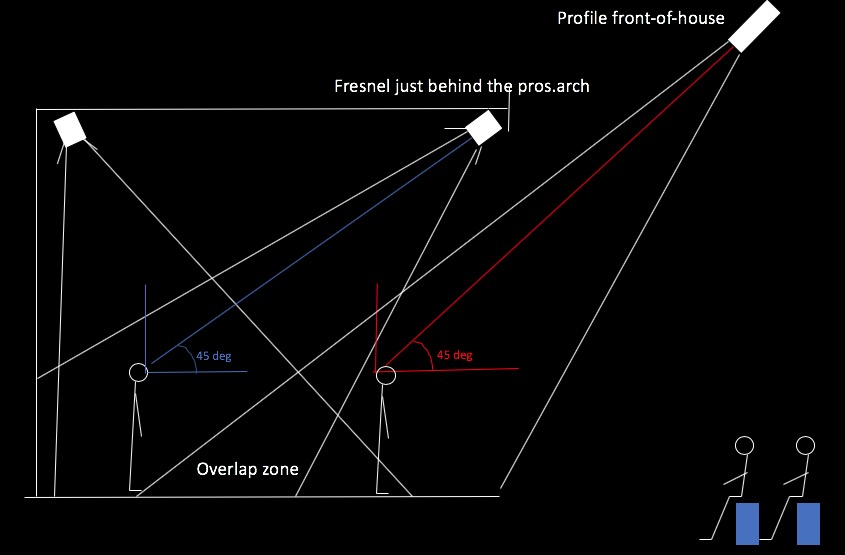
Profile / Ellipsoidal covering downstage from front-of-house, above the audience and closer fresnel providing upstage coverage.
A pair of front-lights are used on each zone to ensure the stage is well-lit for all of the audience, and often two contrasting colours ('warm' and 'cold') are used for naturalistic lighting. These should be 60-90 degrees apart. Always use a backlight from above or slightly behind the actors to help even out shadows and to help sculpt the actor and to separate her/him from the environment.
For any audience layout other than end-on, think about the view from each audience location. What is a front-light for some audience might be a backlight for others.
The ABTT has hosted a seminar on Lighting-In-The-Round during the Coronavirus pandemic (click image to view).
For Traverse, the audience is on opposite sides of a long thin performance area. Light from above each audience is likely to shine into the eyes of the other audience, so cross-lighting from above the stage area is the best option. This works very well for dance / movement-based work. You may need additional face lighting from above the audience, depending on the size of the space.
In-The-Round - The audience is on all sides of the space. Each part of the stage should be treated as an acting area with light from 3 angles. Each source will be a front light for some audience, and a backlight for others, so these should all be gelled similarly, with stronger colours from (for example) directly above the area.
Dance Lighting
For dance lighting, or for musical numbers (or concert lighting) you may not need much (if anything) from above the audience. Dance shows are usually lit from booms (aka trees) in the wings, giving a sharp cross-light to illuminate the dance space without lighting the floor of the stage. Dancers then appear as brightly-lit bodies in a dark space, enabling you to have absolute control over their lighting vs the set or any other visual elements. The eyes / faces of dancers or musicians are often not as relevant as those of actors.
There are often 3 different heights of sources used on each boom, named after the parts of the dancers they line up with: heads, mids and shins. The number of booms needed depends on the depth of the stage - often three or four 'bays' are used, to cover dancers from upstage to downstage.
Back in the pre-LED days, lighting designers who wanted variety specified that the gel colours in each boom should be changed at specific points during the performance, sometimes at great speed in short blackouts between dance sequences, with a crew waiting for a exact moment to silently take the old gels out and put new ones in.
Now it is more efficient to use LED profiles in these locations, to enable instant infinite colour shifts.

Decision Four - Which Colours Should I Use?
Traditionally, a general cover for a drama for an end-on audience has two front lights and one backlight per area.
In order to make the lighting more dimensional, it can be helpful to have slightly different colours in each of these lanterns.
The front lights should be pale colours, so that the actors' faces can be clearly seen, and should be chosen to fit the show.
If you know you have a lot of night-time scenes, and a lot of sunny day scenes, you can look at pale blue for one front light and a yellowy ('straw') colour for the other.
A comedy may be better with pink and straw. If you have performers with varying skin tones, looking at colours in the lavender range will be a better choice.
The backlight can be a slightly more intense colour (if you want) - I'm a fan of lavender backlight.
Of course, the colour choice may be completely different if you need a more stylised look. And sidelight (either from the wings, or a steeper angle from above) is better than front light in some situations (particularly musicals / opera / dance).
Focussing the General Cover
Rule One - Don't light the floor - ensure you always check the light is doing the right job at performer head height. Use someone to 'walk' around the stage as you focus each light to check shadows and correct overlap between beams. If you don't have a walker, check it yourself, using your shadow to judge how well-lit you are. You can also use your hand as a reference as you walk around the stage, watching your hand held at head height, to check for dark spots. Avoid looking into the light while you're focussing - always use your shadow to see where the beam goes. Remember to look at the stage from the audiences' point of view, and ensure you concentrate on actors' head height - also be wary of very light-coloured costumes - these will clearly show up any hard lines, or dark spots, as the actors move around the stage. To avoid dark spots, make sure there is enough overlap between acting area coverage, and ensure the corners of the stage are adequately lit.
Rule Two - Check for stray light - make sure the proscenium arch, orchestra pit, audience seating areas are not illuminated. Use the shutters on profiles or the barn doors on fresnels to cut-off any unwanted light. Also check the coverage on the set - the general cover should be just for the actors. Lighting for the set should be separate, so that you can adjust the levels independently from the acting areas.
Rule Three - Avoid hard-edged beams on acting areas. These will look odd when actors move across the stage. Use focus controls on the lantern to soften the edges of the beam, or keep the hard focus and use a light frost in the gel holder to soften the beam. Don't use frost that is too heavy, as you'll find the accuracy of your wash is compromised. Frosts scatter the light, and can end up lighting up the auditorium more than you intend.
Rule Four - Check the wash from all audience locations. If you're lighting for a video camera as well as a live audience, ensure you've arranged to have the cameras available during your lighting focus, to ensure that the lighting looks even on camera.
Rule Five - Don't focus with the working lights on - you should also avoid having anyone else working on stage during the lighting focus, so you can see everything without distractions.
See also Focussing Lighting page.
MORE COMING SOON
Created 8 April 2019
Last updated 12 December 2023
Written by Jon Primrose
Please send comments via the Contact Us page